The SwiftUI Layout protocol is a powerful tool for defining your own complex layouts. It is new with iOS 16. Previously, you had to become creative if the capabilities of HStack, VStack, ZStack and Grid were not enough for your layouting needs.
When the iOS 16 beta SDKs came out, I read a bit about this new protocol but never had any real need for it — until recently.
Requirements of the layout
My goal was to create a horizontal layout similar to HStack that would overlap its children a bit. Its intended for a list of image views. If, however, the available horizontal space was not enough to fit all children, the layout should increase the amount of overlap to make them fit.
I wanted to layout to be as dynamic as possible and to not assume anything about its children. For simplicity’s sake, though, in the final implementation it assumes that all children are of the same size.
In Figma, the design looked like this:

Easy enough, I thought. During the implementation, I realized that overlapping views in SwiftUI had always meant some kind of weird hack in the past and that it might not be done with a simple HStack.
Luckly, I remembered that I had saved this awesome in-depth article about the SwiftUI Layout protocol and now I had a reason to work through it.
The result is what I got from reading the first part of the article. In its second part, more advanced topics like caching and custom animations are discussed. The following layout does not pay attention to those features in its implementation. I think it is still a simple example on how to use the SwiftUI Layout protocol.
Defining the basics
We first define this new layout. The idea is that all views overlap each other by 6 points by default.
| |
To implement the basics of the Layout protocol, we need to implement sizeThatFits(proposal:subviews:cache:) and placeSubviews(in:proposal:subviews:cache:). Here is a simple implementation that places all views next to each other without spacing. This is based on the previously mentioned article’s implementation.
| |
This code will result in the following layout, leaving us with a feature-less HStack implementation.

Sidenote: As we are implementing the characteristics of a stack, we also define the layoutProperties property. The LayoutProperties type does not provide any other properties.
| |
Overlapping our subviews
Coming back to our layout code, we now begin to use the overlap value specified to us in the type’s definition. Basically, we decrease the offset amount for each view by the amount of overlap:
| |
Easy, we now have overlapping views within our layout. This was the easy part.

Increasing the number of subviews while restricting the available width, we can see that our layout implementation does not care. It still asks its subviews for their optimal sizes and builds the layout structure from that, without care for the environment its in.
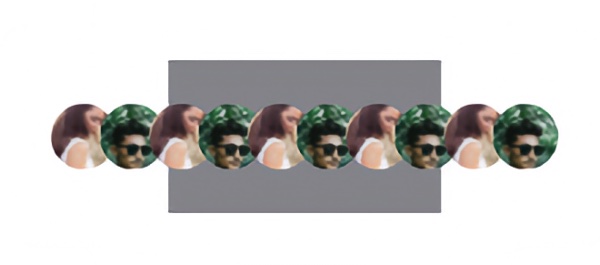
Increasing overlap for constrained width
Now this is where I spent most time during my implementation of the layout.
First thing to do is unify the code that determines the amount of space the layout wants to use and the implementation of the placing of the views itself. Otherwise, you need to be careful not to use a different amount of space that you requested.
Second, we need to calculate the total width that we need for our subviews minus the overlap and compare that against the maximum available width, if applicable. The latter part is what our layout code currently does not do and also the part where the logic might get complicated. This is because the layout will be queried for different sets of constraints to see what sizes it would take. Basically, SwiftUI is probing us to find out the best layout possible. Sometimes, this includes a fixed width value, other times it will be for the minimum or the maximum size.
Calculating the total layout size with dynamic overlap
Let’s first take a look at the sizeThatFits. Implementation details for size(of:in:for:)? and totalOverlap(for:on:) are described in the last section. The calculation of the layout size is more complicated but should be straight forward.
| |
Placing views with dynamic overlap
Next, let’s take a look at the actual placing of the subviews. Once SwiftUI has decided on the layout’s size, we can determine what our actual overlap needs to be for the available width. The placing of the subviews is similar to what we had before. We use a few helper functions that calculate the width of each view and the overlap needed to fit all views within the available space. Implementation of those functions is described in the next section.
| |
Calculating common values before and during the placement of views
Previously, I mentioned common helper functions for calculating view sizes and overlap. These are described in this section.
On a high level, we have functions that calculate a subview’s size and another set of functions for calculating the overlap of views given a particular width.
size(of:in:for:)is used for calculating a subview’s exact size given the proposed size for the entire layout. It will distribute the available width evenly between all subviews and return the size that the subview determines best for that configuration.proposeSubviewWidth(for:with:)proposes a subview’s width. If the proposed width from the layout is no exact value, it will simply return the same value. If we have a exact width value, then we add the overlap to the available width and divide it by the number of subviews.totalOverlap(for:on:)calculates the total overlap that all views have between them. Simple.overlap(forWidth:distributing:proposedViewSize:)takes the total width of all subviews and reduces it by the amount of overlap between each subview. The value is reduce twice because the overlap allows both views’ widths to be neglected by that amount.
| |
Results
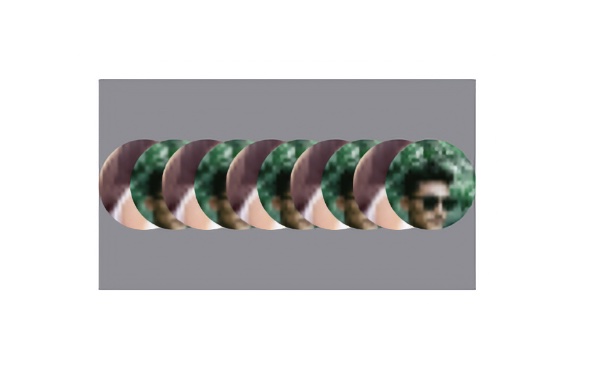
Now, we can show a few views next to each other. Each one is slightly overlapping its predecessor.

If we restricts the available width, the layout will dynamically increase the overlap to allow all children to fit within the container. Notice how the views are resized as well. All views are of the same size still.
We can even fit in a Spacer that will take up the same space as our children!

I know this is neither the most exciting layout idea out there and the implementation might not be the best there is. Still, I think it shows the flexibility and ease of use on the API level. I am excited to use it again should I come up against another demanding layout. Apple is creating new ways to build our interfaces each year so maybe there’s even more coming at WWDC2023.